The following article appeared in the April, 1993, Bulletin.
Antonio "Tony" Rizzo is a retired aerospace engineer
from Torrance, California, and has been a SCAVM member since 1989.
He is our president for the year 2001. He has a Web site at www.arviolins.com.
METHOD FOR TOPOGRAPHIC GENERATION OF PLATE ARCHES
by Antonio Rizzo
The objective is to develop a topographic map of a plate (top
or back) from cross-sectional views of the arch, on the plan view
of the plate. Once developed, each plateau of the topography can
become a template for accurate replication without pantographic
means.
I don't consider this a novel approach. I'm sure many variations
of this scheme have been done before. For better or worse, here
is the way I do it.
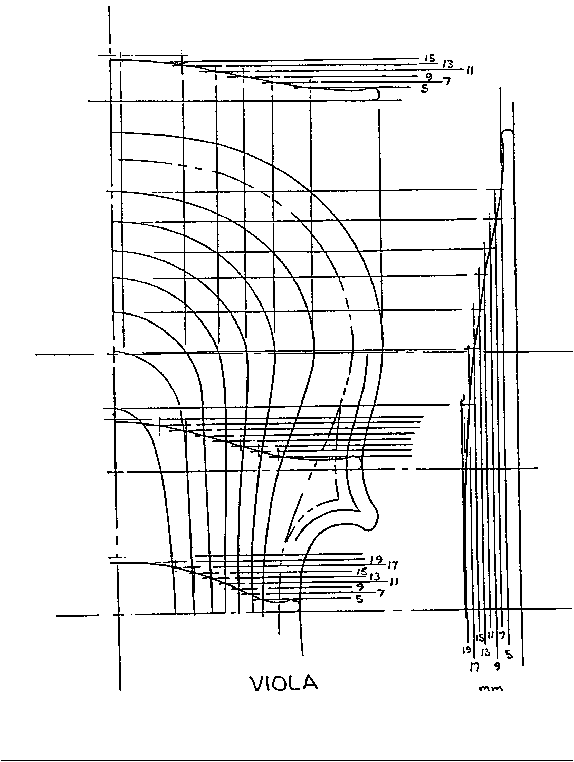
Let's review the arches from Sacconi's Secrets of Stradivari:
If we had a plate that we wanted to map, we could set up a
height gauge to a specific height relative to the plate gluing
surface and draw or establish a parallel plane on the plate which
in a plan view will show as an outline for that particular elevation.
Incrementally raising or lowering the height gauge will establish
parallel planes. An infinite number of planes could be established,
however, from a practical sense, two millimeter increments will
generate enough plateaus for reasonable accuracy.
Now lets take cross-sections at the five (quinte) locations
as Sacconi did, and a cross-section of the longitudinal centerline.
From the centerline in the plan view, at a quinte location, measure
the distance to the topographic line for a particular plane, and
transfer that point to the quinte cross-section on that corresponding
plane. After all points are plotted from all planes, connect the
points with a French curve and the arch for that cross-section
is complete. Repeat this step for all quinte cross-sections.
It appears that this may have been the method used by Sacconi
in copying the Stradivari G model violin in his book (along
with a viola and cello).
So much for Sacconi.
Now let's assume the opposite which we often see in Strad magazine
posters or purchased plans for instruments, where only the quinte
templates and longitudinal template arches are shown along with
the plate outline and with no topography. Establishing a topographic
map could simplify an accurate reproduction of a particular instrument
plate.
To begin with, we must have some confidence that the curves
of the arches provided were reproduced accurately. Draw or trace
the outline of the plate as a plan view, and the five transverse
cross-sections and the longitudinal cross-section in views which
can be projected on each other or superimposed. We can now begin
to establish corresponding planes on each cross-section. Where
these planes intersect the arch is the point that will be projected
or transferred to the plan view. Accuracy here is important in
determining the exact point of intersect when the slope of the
curve and the intersecting plane form a shallow angle.
The lowest plane could be (on a violin) five millimeters up
from the plate gluing surface. This would provide material for
the four corners. Each plane above this plane could be set at
two millimeters apart up to the highest arch dimension.
 Project all points from each cross-section
arch to their corresponding line in the plan view. We now have
points located on each quinte line is where some guesswork comes
in, interpolating the topographical profile between points with
a French curve, and on the longitudinal centerline.
Project all points from each cross-section
arch to their corresponding line in the plan view. We now have
points located on each quinte line is where some guesswork comes
in, interpolating the topographical profile between points with
a French curve, and on the longitudinal centerline.
Here which when compared with the adjacent profile will produce
a contiguous smooth flowing curve at any given cross-section.
Connect all the points on each plane to form the outline of each
plateau. The map is now complete.
Have a plate ready to be arched, with a thickness close to
the dimension of the arch height.
Using the topographic layout of the plate, make a template
for each elevation. Templates can be made from aluminum or plastic
sheet stock, 1/16" or 1/8" thick. Drill a 1/8"
diameter tooling hole at the center of the upper and lower bouts
on each template. To assure that the hole center distance is alike
with each template, stack all the templates aligned with each
other and drill through the stack. Templates that are longitudinally
shorter than the tooling hole center distance should be pinned
with a separate set of holes.
Make a rectangular platen from 3/4" plywood, a few inches
larger in size than the plate. From a template, transfer the two
tooling holes on the centerline of the plate to be arched and
to the platen. The holes in the plate should not be deeper than
five millimeters (which can later be gouged out when graduating).
The holes in the platen should be drilled through. Install 1/8"
diameter dowel pins (steel or brass) into the platen with 1/16"
projecting through the bottom side.
Bond or screw in place four feet to the bottom side of the
platen at each corner. The feet should be the same thickness as
the templates. In fact, the same material can be used. The feet
will prevent the platen from tilting when a small template is
being used.
Set up a drill press with a large plywood table extension fastened
to the drill press table. Drill for, and install a 1/2" diameter
guide pin centered with the drill press spindle. The pin should
protrude no more than the thickness of the templates. Chuck a
1/2" diameter router bit in line with the guide pin. A router
could be used instead of the drill press. It would require a fixture
to support it directly over the guide pin.
Place the plate to be arched over the tooling pins on top of
the platen. Fasten the plate to the platen with two #8 flat head
wood screws from the underside of the platen and located inboard
of the two dowel pins. Do not go too deep into the plate with
the screws. Place a template over the tooling pins on the bottom
of the plate. The templates could be held in place with flat head
screws if desired. Now rest this assembly on the plywood drill
press table.
Set the cutting edge/face of the router bit to the highest
elevation using the top of the platen as a datum surface. Make
sure that the corresponding template is installed under the platen.
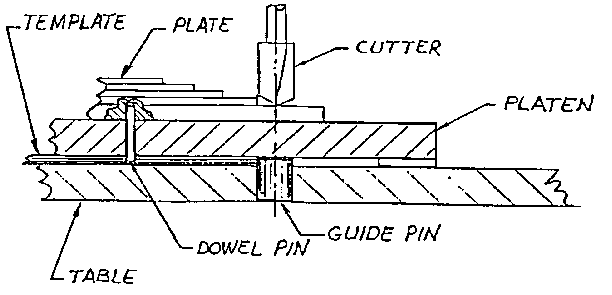 Drive the router bit at a high speed and (CAUTION)
slowly push the work into the cutter, removing material, until
the template bears against the guide pin, the cutter is milling
away the corresponding plateau on the plate. Keeping the template
against the guide pin, guiding the platen around the pin as though
you are using a pin router setup. Change template as each plateau
is completed. Start with the highest elevation (smallest template)
and work down. Change the depth of cut of the router bit to correspond
with the appropriate template (say two millimeters between each
plane or whatever is established). If desired, mill the elevations
one half millimeter higher to allow material for hand finishing
and slight discrepancies in the setup.
Drive the router bit at a high speed and (CAUTION)
slowly push the work into the cutter, removing material, until
the template bears against the guide pin, the cutter is milling
away the corresponding plateau on the plate. Keeping the template
against the guide pin, guiding the platen around the pin as though
you are using a pin router setup. Change template as each plateau
is completed. Start with the highest elevation (smallest template)
and work down. Change the depth of cut of the router bit to correspond
with the appropriate template (say two millimeters between each
plane or whatever is established). If desired, mill the elevations
one half millimeter higher to allow material for hand finishing
and slight discrepancies in the setup.
With all of the plateaus milled, we now have established a
series of steps where the internal corner or root of each step
is the location of that topographic line of the layout. By planing
away the corners of each step down to the root and blending the
contours we will have an arch which will be dimensionally close
to the copied instrument.
All Bulletin articles are copyrighted ©1997
by the Southern California Association of Violin Makers. Contact
Bulletin editor John Gilson, at the address given on our home
page, for permission to reproduce Bulletin material.
Return to home page of the Southern California
Association of Violin Makers