The following article by Albert W. Fischer originally appeared in the May, 1981, issue of our Bulletin.
Al Fischer was an engineer for General Motors where he worked directly with another ingenious engineer: none other than Charles Kettering. Al's retired now and lives in La Jolla, California. He's been an amateur violin maker since 1939.
Al has been a SCAVM member since January of 1968. He was president of the Association during 1970. He is a regular contributor to our Bulletin and is the designer of numerous ingenious jigs and fixtures useful in instrument making. He is well known for the application of power tools to the art, but is very adept in the application of hand tools as well.
Al's planning a presentation on this subject was the feature
of our August meeting in Al's shop. He has prepared the Addendum
at the conclusion of the article based on experience since preparing
the original article. The original article and the Addendum were
published in our August 1997 Bulletin.
Purfling, to me, seems to be one material used in making a violin that could stand a few improvements. Industry furnishes it to the maker in straight lengths from 25 to 30 inches long, and is probably sheared from large laminated sheets, as the edges are not square but have a parallelogram cross section. If wood is used for the black lamina, it probably is dyed black and there is always the possibility of the dye bleeding into the adjoining wood when wetted with glue. If the proper heat and moisture is not applied in bending, such as is required at the corners, the purfling has a nasty habit of wrinkling or cracking. If adequate heat and moisture is applied, they are also the requirements for making violin glue liquid. This results in a myriad of problems such as the lamina becoming unglued, sliding and shifting out of position, developing lumps or compressed areas. Bending the purfling singly may result in crooked pieces, because one edge or the other may have greater pressure applied. This problem is remedied by bending four or more strips at one time, but now the strips are bonded together due to the glue oozing out and bonding the adjacent edges together. To make bending the purfling a little easier, someone had the bright idea of using black fiber instead of wood, and now we have a different set of problems. Fiber does not cut clean like cutting wood, and tends to mush out, unless care is taken , using very sharp tools. It is more difficult to obtain a well defined miter joint and a sharp "bee-sting." Also there is a tendency for the fiber to mush out when being forced into the purfling groove, and when trimming the glued purfling flush with the plate. I think at one time or another I experienced all of these problems. In examining the work of other amateur makers, they must have, too, because a nice clean purfling job is seldom seen. In working on my first viola, I came to the job of putting the purfling in the plates. I found that my limited stock of purfling had a few strips of the right thickness, but it had black fiber laminations. I had learned over the past years to cut a very precise purfling groove by machine, and I wanted an equally precise purfling to fit it, so I decided there was no other way than to custom make my own. It had to be preformed so no final bending or fitting was necessary, thus eliminating all of the above problems. With the methods I used, I found it was not too difficult to do, and the results were so superior, that I doubt if I will ever use commercial purfling again. Following is the method I used to make this preformed purfling.
. Probably the most economical source for wood for laminating the purfling is to buy sliced veneer as is used in Marquetry work. This veneer is available in strips 3 ft. long, 6 to 12 inches wide and 1/28 inches thick, from suppliers such as Albert Constantine and Son in New York. The veneer will be cut into widths 3/4 in. wide, as this is the thickness of the form on which I chose to make the purfling stock. This narrow a strip can also be cut from solid stock, if you choose, on the jig saw or band saw. If you have ample stock you can even use a table saw, but most of the wood will wind up as sawdust. I chose to cut the strips on the jig saw from solid stock that I had on hand. I used a 3/16 inch wide blade, 0.030 in. thick with 10 teeth per inch. Usually the set on a jig saw blade is not too even which results in a rough surface on the cut. By lightly honing the set of the teeth on a flat hone, a very smooth cut can be achieved. Also the temper in wood cutting blades is such that the teeth can be filed. It really helps in cutting wood such as ebony, to sharpen the teeth from time to time. The strips are cut using a wooden fence clamped to the jig saw table and adjusted for the thickness of strip desired. Allow about 1/64 in. for finish sanding. I used Ebony for the black lamina and white Eastern Maple for the white. If you cut Eastern Maple exactly on the quarter, you obtain a speckled grain such as seen on violin bridges, and I feel it gives the purfling a little more character than having just a white solid line. The sawed strips, or the veneer strips, are then finish-sanded to the final thickness, using the same tungsten carbide sanding disk and fixture I use for sanding rib stock to thickness. If you are not familiar with this method, I can only refer you to the publication of my methods of violin making in the Journal Of The Violin Society Of America, Summer and Fall edition 1978. It also shows my method of cutting the purfling groove in full page pictures. In sanding this thin stock I offer one suggestion: put a 3/32 in. shim under the left end of the fence to tilt it slightly lengthwise. This causes all of the sanding to be done on the leading edge of the disk and forcing the strip against the fence. No sanding is done as the strip leaves the disk. This prevents the strip from being pulled away from the fence by the trailing edge of the sander with the possibilities of damage. The thickness of the laminating material will of course depend upon the width of the groove, and one's preference for the black line width. My finish purfling cutter for the viola cuts a groove 0.058 in. wide, so I designed the purfling:
Black Ebony........................0.013 in. thick,
White Maple .......................0.028 in. thick
Black Ebony .......................0.013 in. thick
Allowance for glue and fit.....0.004 in. thick
Total...................................0.058 in. thick
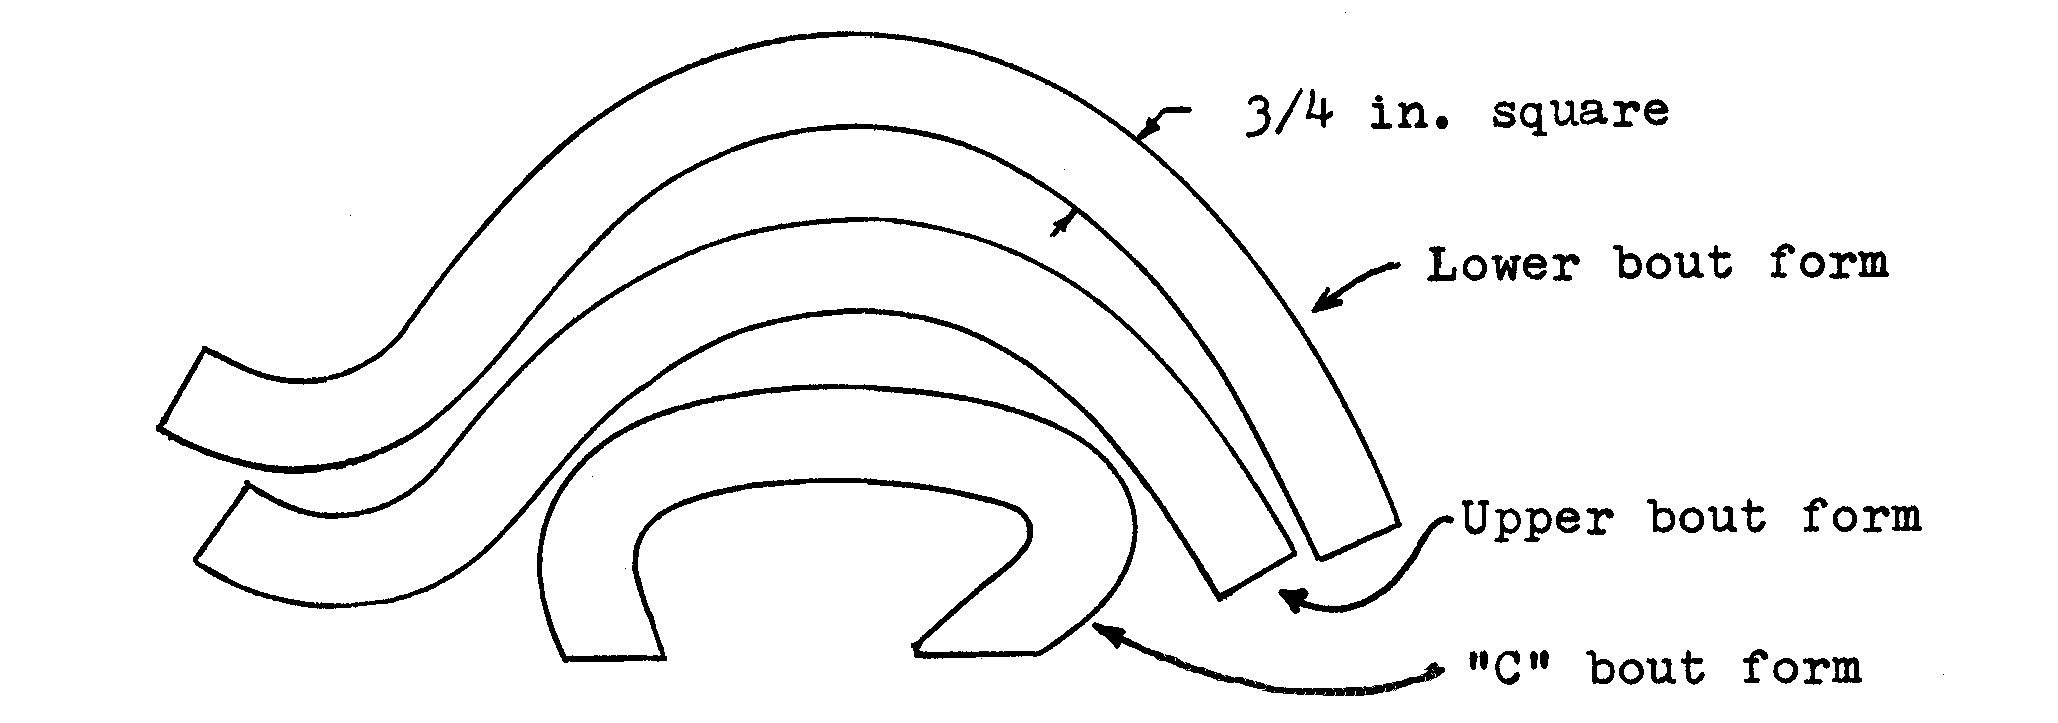
The laminations will be glued together on forms that will reproduce the exact shape of the purfling groove. Three forms are necessary: one for the upper bout, one for the lower bout, and one for the "C" bout. These forms are made from 3/4 in. Eastern maple and have a cross section 3/4 in. square. The inner edge of the purfling groove is used in making the end bout forms, and the outer edge for the "C" bout form. For those who cut their purfling grooves by hand, you can make a template of the groove for making the forms by taping a strip of thin paper to a plate with an already cut groove and tracing the groove around with a ball point pen. The paper will indent enough so that the point will follow nicely the path of the groove. With my fixture for cutting purfling grooves, there is a more accurate way of generating the curve of the form. A piece of ¼ in. plywood was fastened to half of the fixture with four screws that normally are used for the hold-down fingers on the plate. A shallow purfling groove was cut in the plywood just as it would have been cut in a plate. Paper templates were then made of the three forms—using the ball point pen for tracing the groove. Allow an extra ½ in. stock on each end. The templates were then arranged on a piece of 3/4 in. thick maple with the grain running lengthwise to the forms. By nesting them together, a minimum of stock is required.
After rough sawing the forms to shape, they were tack-glued to the plywood so that the form edge overlapped the edge of the purfling groove slightly. An accurate cut could then be made about 1/32 in. deep with the finish purfling cutter right on the maple form. The "C" bout form has to be done separately due to corner interference. The forms were then removed and finished on the drum and disk sander to the edge cut by the purfling cutter. This gives a very accurate form and the purfling made on it will fit the groove precisely.
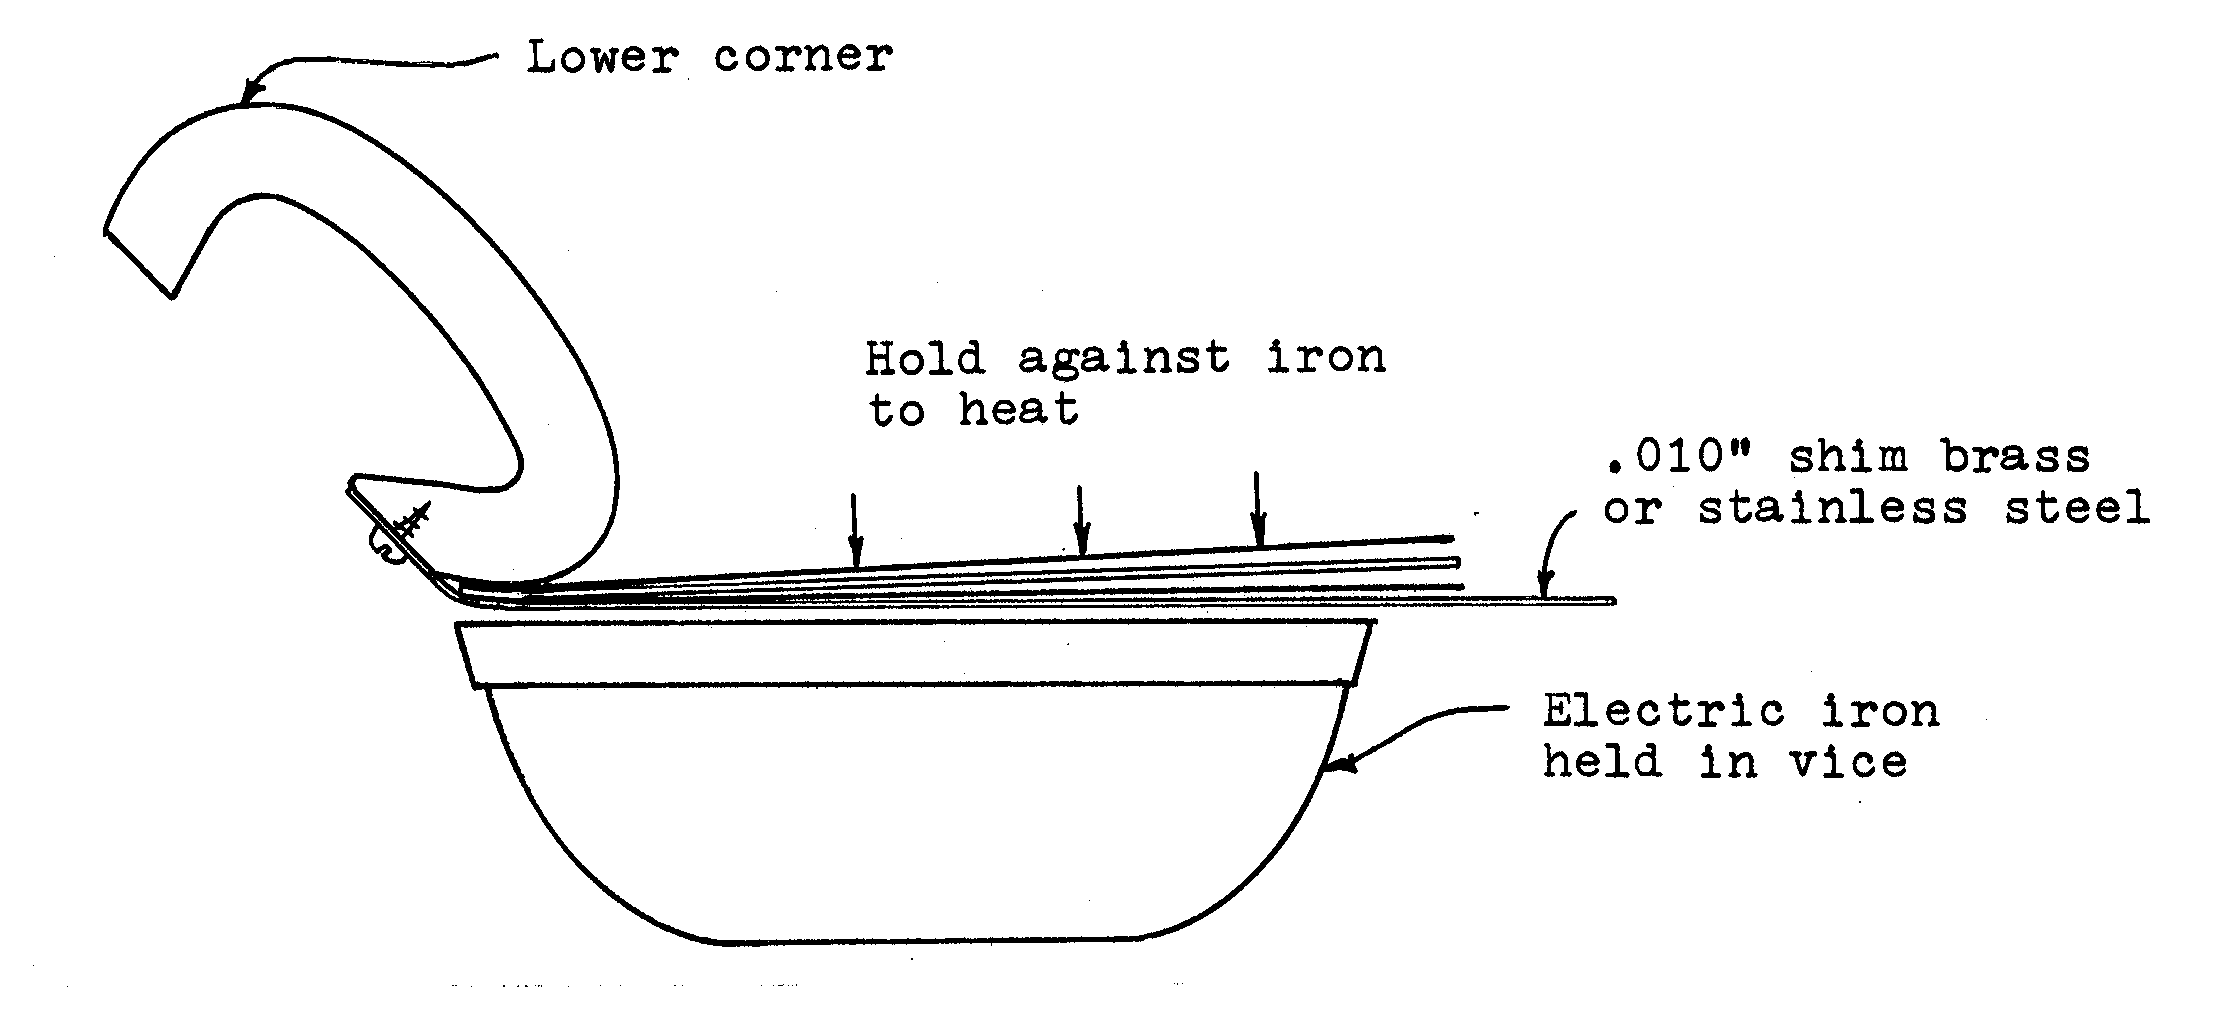
Preforming the laminating material at the corners is a necessity before gluing to avoid cracking, and to simplify clamping. This is done in the same way as ribs are formed, using an electric iron as the heat source. In this operation do not wet the stock, as the water will raise the grain of the wood and increase the final purfling thickness. The laminations are thin enough and there is adequate moisture in them to bend dry without cracking. Bend the three strips in one operation.
For the "C" bout, preform the entire length. For the end bouts, preform only the corners, using the "C" bout form to do the bending. The laminations will easily bend cold the rest of the way on the form in the gluing and clamping operation.
The purfling takes its final shape in the gluing operation, and, when the glue is dry, it will conform exactly to the shape of the form. The selection of glue is important because four surfaces have to be thinly coated and then clamped. I doubt if anyone could do these quickly enough with popular wood glues, before some of the glue has set. For ease of gluing I chose to use a two part clear epoxy as the adhesive. With epoxy you have ample time to coat and clamp the work, as it will not start to set for an hour or more, and requires a day to finally harden. The normal epoxy is fairly thick and hard to spread evenly, but thinning it a little with epoxy or lacquer thinner facilitates spreading a thin uniform film on the surface. Just wetting the surface with epoxy is sufficient to bond the material together, and minimizes the problem of excess epoxy squeezing out and running where you do not want it. A piece of rubber glued to a stick and used as a squeegee makes a good spreader.
Clamping of the epoxy coated strips is done on the form with a backup strip of sheet metal and 5 to 6 feet long rubber strips, ¼ in. wide, cut from an old inner tube. These strips are easily cut to this length by cutting round and round on a cross-section of inner tube. The strip can be a little shorter for the "C" bout form. On this form the strip of 0.010 in. stainless steel or shim brass—attached to the upper corner with a wood screw—is used as is for clamping with the rubber. To insure clamping pressure at the center of the purfling, because of the thinness of the metal, a double thickness of the ¼ in. wide rubber was laid along the center and the clamping rubber wound tight over it. Also to avoid any possibility of epoxy oozing out and bonding the purfling to the form, a strip of 1 in. wide waxed paper was inserted. This leaves a lot of loose ends to handle on one end while wrapping the rubber strip tight around them, so temporarily anchor them with a spring clamp while proceeding with the rubber wrapping. On the other two forms a 0.020 in. backing strip was used. Here the metal is rigid enough crosswise, when roughly bent to shape, that the rubber center strip is not needed. A thin coat of car wax on the metal will keep stray epoxy from sticking to it. Avoid using anything that might coat the purfling and prevent glue from bonding to it when assembled in the plate.
At this stage we have a strip of purfling, accurately preformed, but ¾ in. wide. On a sanding board, sand one edge square and flat. The next step is to slit this into strips a little more than 1/16 in. wide. This was done on the drill press using a ¾ in. dia. slitting saw 0.015 in. thick. These saws are made of high speed steel and should be available with mandrels to fit at any well stocked hardware store. Brookstone has them in their catalogue.
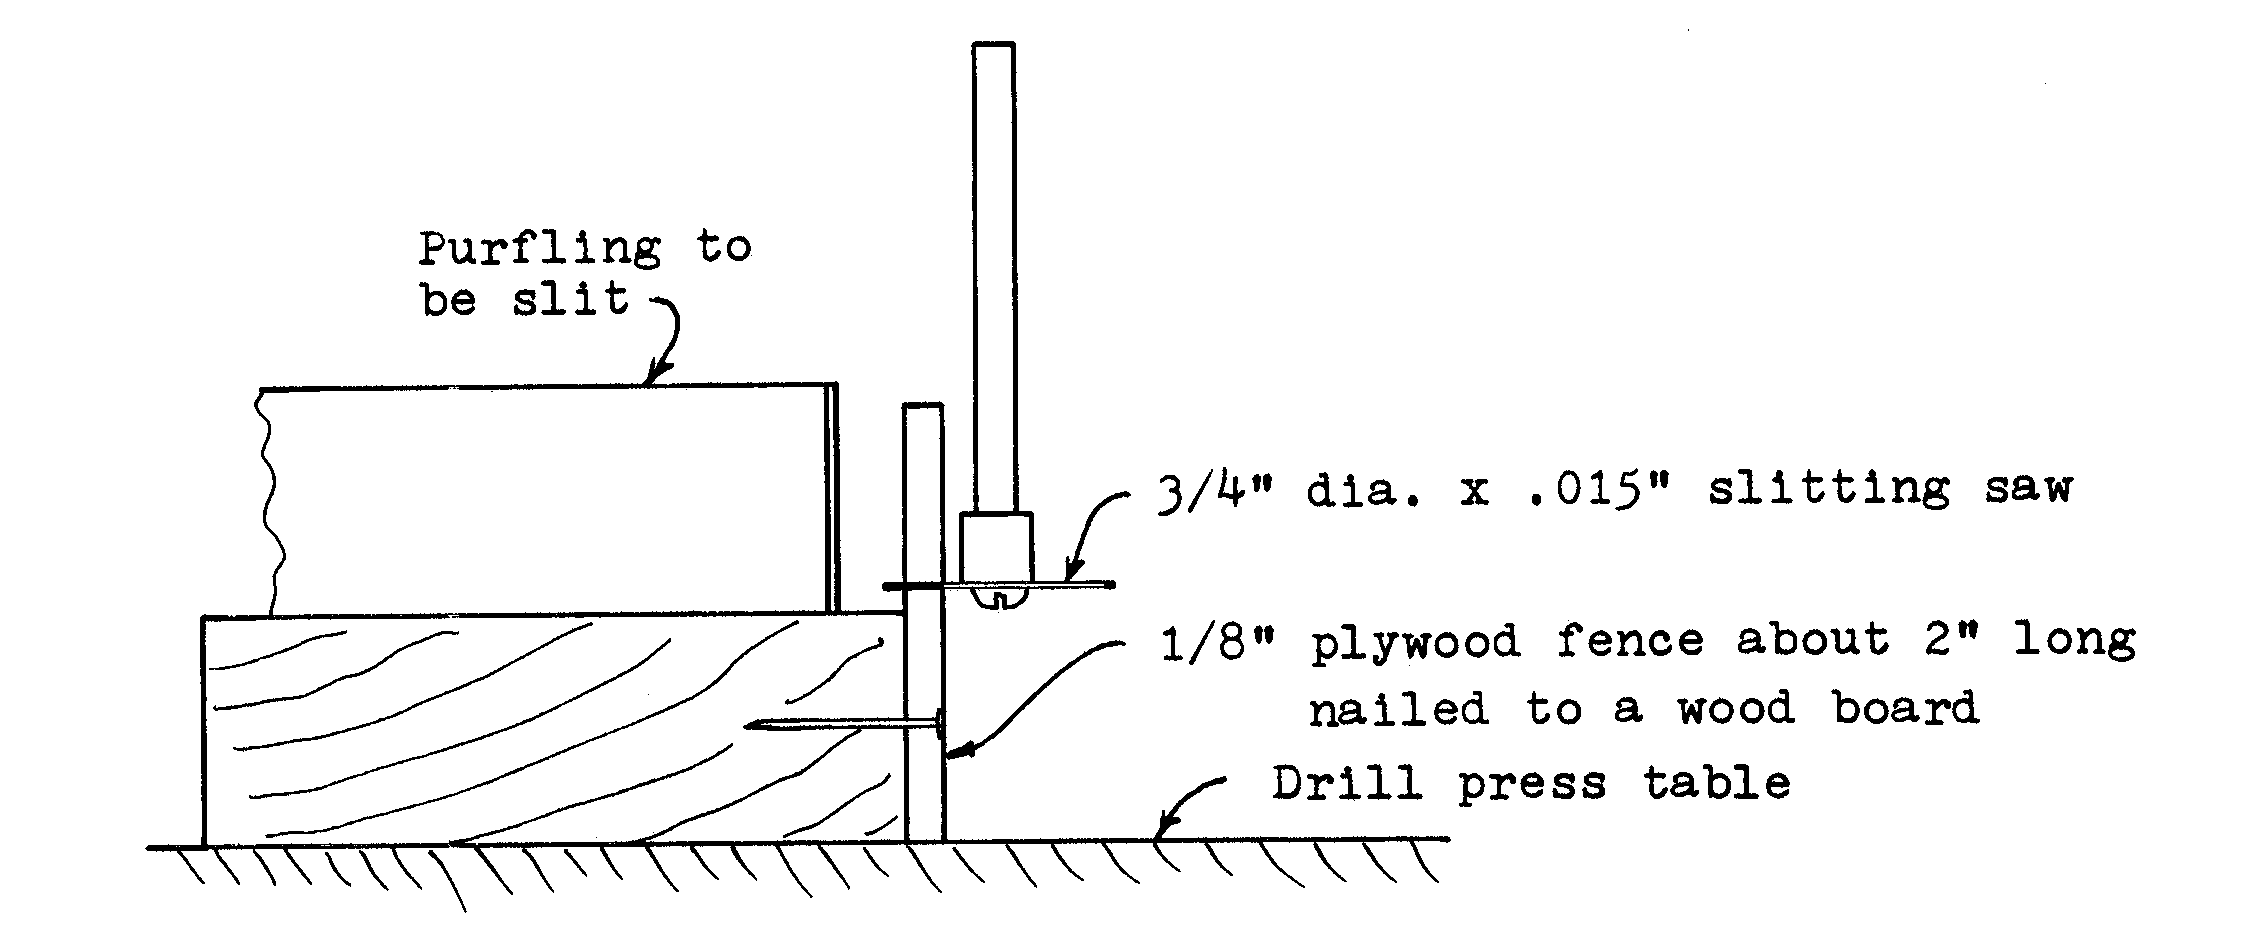
Adjust the height of the saw above the surface of the wood board to cut the width of purfling desired. Turn the saw on and saw through the fence close to the left end so the saw extends through about 3/32 in. Turn the saw off and clamp the board to the table in this position. The "C" bout purfling presents no problem, as you start at the right end and continue sawing all the way around. Always saw by pushing against the direction of the saw. The purfling for the end bouts—because of the reverse curve—has to be sawed in two stages. Saw the corner end first, as far as you can go. Then reverse ends and saw the remaining strip. The saw cuts very clean, square, edges, and no further finishing is necessary. A 3/4 in. wide strip should yield eight strips of purfling, or enough for two instruments.
Since writing the above article on making preformed purfling for a viola, I have made purfling for the violin. This required thinner stock and I experienced problems with the carbide sanding discs used before, tending to chew up the material. Better results were obtained by making sanding discs out of ¾-inch particle board faced with sandpaper as used on power disc sanders, with a setup as shown below.
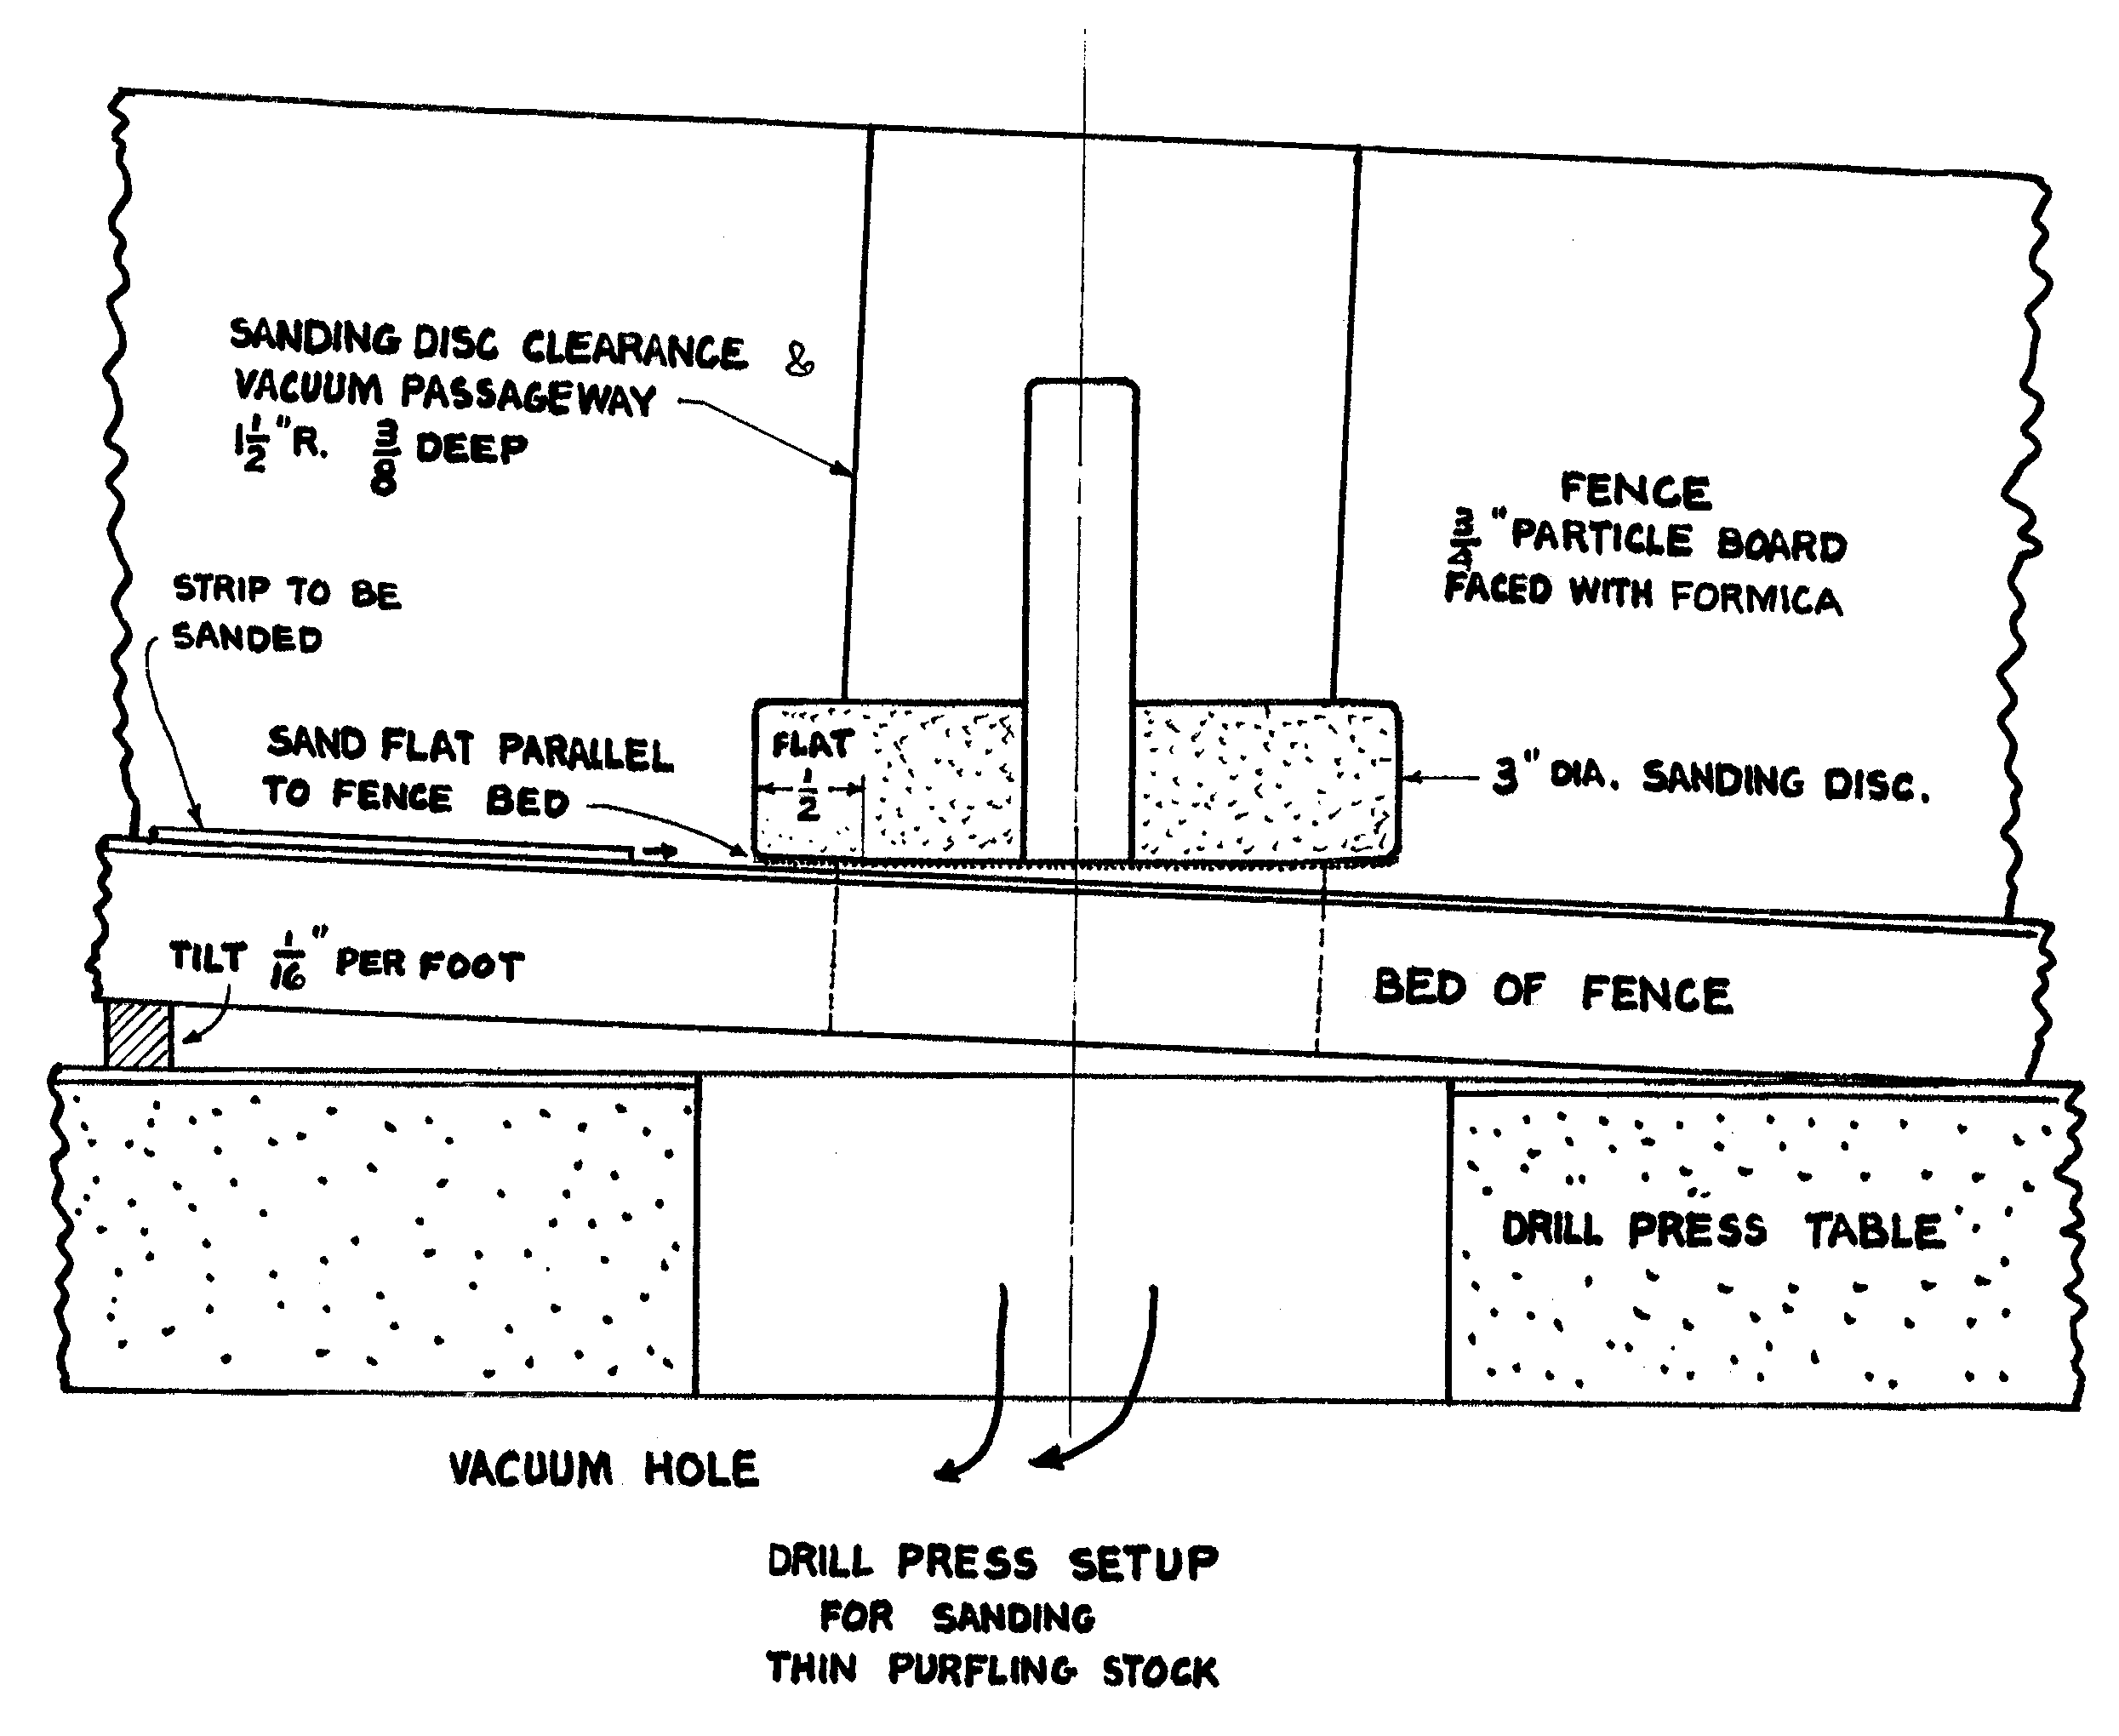
The sanding disc, before applying the sandpaper, was accurately given a ½-inch wide taper on the outer edge by placing a sheet of sandpaper on the sloping base of the fence fixture and, with the power on, sanding the ½-inch wide taper against the sandpaper. This will insure a ½-inch flat sanding surface that will be parallel to the sloping base of the fence. All of the sanding will be done on this edge of the disc with the strip being forced against the fence and clearance on the trailing end. There will also be a force tending to move the strip from left to right and must be governed by the fingers. A 1/16-in thick strip of sponge rubber is useful in adding friction here.
Before removing the disc from the chuck, mark its location in the chuck so it can later be chucked in the same position. This minimizes any slight error the chuck may have. My drill press chuck is a #6A and I use the A to mark all my tools for better chucking accuracy. The sandpaper used is that used on power disc sanders, where the grit does not wear of as easily as on garnet paper. A 120 grit works well for finishing, but a coarser grit may be preferred for roughing down to almost finished thickness. The sandpaper was applied with contact cement. Use a rubber hammer to curve the paper over the edge to insure a good bond.
In clamping the purfling strips to form the upper and lower bout, five loose pieces have to be positioned before winding on the rubber band to clamp the strips to the form. Here I found a small wooden clamping block faced with 1/16-inch rubber band curved to fit just the small radius of the form was easier to use. All the pieces can be accurately positioned on a flat surface and the block and clamp applied. It is then simple to wind the ¼-inch wide rubber band around the rest of the form to glue the purfling strips together.
The slitting saw mentioned in the above article can cause problems. It is made of hardened steel and hollow ground with not set to the teeth. This works fine for milling a short slot but when used as a saw it has a tendency to follow its own slot rather than the guiding fence. This can result in a purfling strip of non-uniform width. Better success was had with a #406 Dremel saw that I acquired years ago, but had no success buying another. It must have been discontinued. However, it is simple to make your own out of thin clockspring, anywhere from 0.008 to 0.015 inches thick. If you can’t find this in your hardware stores, try buying a taping knife or similar tool made from thin clockspring. I made the saw about 7/8 inches in diameter with a hole drilled for a Dremel mandrel. If you have a small metal cutting lathe you can even make your own mandrel.
Drilling the hole in clockspring can be a problem unless you first make a deep center punch hole so the drill will cut on its outer edge and not on the web of the drill. Cut the saw roughly to size with tin snips and mount on the mandrel. Finish to size and roundness in the lathe or even in the drill press, using your Dremel grinder. Teeth are spaced by eye about 1/16-inch apart and cut straight across, as on a rip saw, with a small triangular file. Every other tooth is set by hand with needle nose pliers, and then the ones in between are set in the opposite direction. To make the set uniform, the saw is clamped between two flat steel surfaces. There will be enough springback to give a slight uniform set to each tooth.
In making the fence for this saw, cut the slot close to the
front edge so the small curvature on the upper and lower bout
can be cut first, starting at the inside and out to the end. The
piece is then reversed to cut the larger curvature out to the
end.
© Albert W. Fischer, 1981, 1997.
All Bulletin articles are copyrighted ©1997 by the Southern California Association of Violin Makers. Contact Bulletin editor John Gilson, at the address given on our home page, for permission to reproduce Bulletin material.
Return to home page of the Southern California Association of Violin Makers .