The following article by Al Fischer orginally appeared in
the May, 1974 issue of the SCAVM Bulletin:
Al Fischer was an engineer for General Motors where he worked
directly with another ingenious engineer: none other than Charles
Kettering. Al's retired now and lives in La Jolla, California.
He made his first violin in 1939.
Al was a SCAVM member from January of 1968 until his death
in May, 1999. He was president of the Association during 1970.
He was a regular contributor to our Bulletin and designed numerous
ingenious jigs and fixtures useful in instrument making. He was
well known for the application of power tools to the art, but
was very adept in the application of hand tools as well.
BENDING VIOLIN OR VIOLA RIBS
by Albert W. Fischer
To bend thin strips of wood to a predesigned curvature
and have them retain that curvature requires reorienting the structure
or fibers of the wood; otherwise it will spring back to its original
form. The common method of doing this is to use a combination
of heat and moisture which transforms the wood to a semi-plastic
state, and, when cooled and dried, the wood retains its bent shape.
The moisture is easily supplied by soaking the rib material
in water for about 15 minutes, and the ideal, clean method of
applying the heat is with an electrically heated, thermostatically
controlled, bending iron. The violin supply houses have such bending
irons listed in their catalogues for approximately $80 [in
1974, editor], if one can afford it, and having one, you have
to master the art of bending the ribs, by trial and error, to
the curvature of the rib mold you are using.
To take the guesswork out of bending ribs to fit a mold, bending
irons have been devised to have the correct curvature of the upper,
center, and lower bouts, and the method used for heating the bending
irons varies according to what is available around the workshop.
I made such a set of bending irons with built in electric heating
elements, and with care they do a good job of bending and forming
the ribs to fit the mold exactly. The problem is the average violin
maker or the amateur making a violin or two as a hobby, does not
have the know-how or the metal working tools and equipment to
make such sophisticated bending irons. While many violin makers
use this method, I feel the bending procedure is completely reversed
in that the heat should be applied before the rib is bent over
the form so it will be in a plastic state to easily bend to the
curvature of the form.
A demonstration on rib bending by Kelvin Savell a year or so
ago [1973, editor}, and also by Roger O'Donnell last year
made use of this technique by using an electric household iron
to heat the flat rib before bending over a wooden form. I feel
this is the correct approach, and it has additional merit in that
the cost of equipment for rib bending becomes almost negligible.
The forms can be made inexpensively from scraps of a good quality
3/4" plywood, and shaped with the same tools that are required
in making the violin itself. A discarded electric steam dry iron
with the thermostat still is workable condition is an ideal source
of heat. The thermostat should be adjustable to a temperature
that will not scorch the rib material. A lot of steam irons get
fouled up by the user not using distilled water and are soon donated
to the Goodwill who sell them for about 50¢ for the usable
parts. Regardless of how fouled up the sole plate may be, a little
sanding with emery cloth will clean it to the bare metal which
makes it again usable for a heat source for bending ribs.
In forming violin ribs I find it more convenient to handle
the rib material and the wood form, rather than the hot iron,
so the iron should be clamped by the handle in your bench vise
with the sole plate up. Lacking a vice, the iron can be provided
with some simple wooden bracket to support it in this mode on
top of the bench. If you are bending ribs for a cello, you may
want to reverse this procedure because of the forms being so much
larger and awkward to handle.
You will find it necessary to anchor or clamp one end of the
rib material to the form at the correct starting point, and once
the rib is bent around the form some means must be provided to
hold the rib to the form until it has thoroughly dried. A thin
sheet metal strip of aluminum, brass, or stainless steel, with
a hard-rolled spring temper will do the job very nicely. Avoid
using steel as it will rust and stain the wet rib material. The
spring temper is preferred as that it will stay flat and free
of kinks and will be reasonably straight for starting the bend
as it must lie in close contact with the rib material before bending.
The center bout which has fairly sharp bends on both ends requires
the thinnest backup material, and I found the side from an aluminum
pop-top can works well here. Remove the curl from the material
by pulling it over a round broom handle. Brass shim stock available
at some hardware stores around .008 to .010 inches thick is also
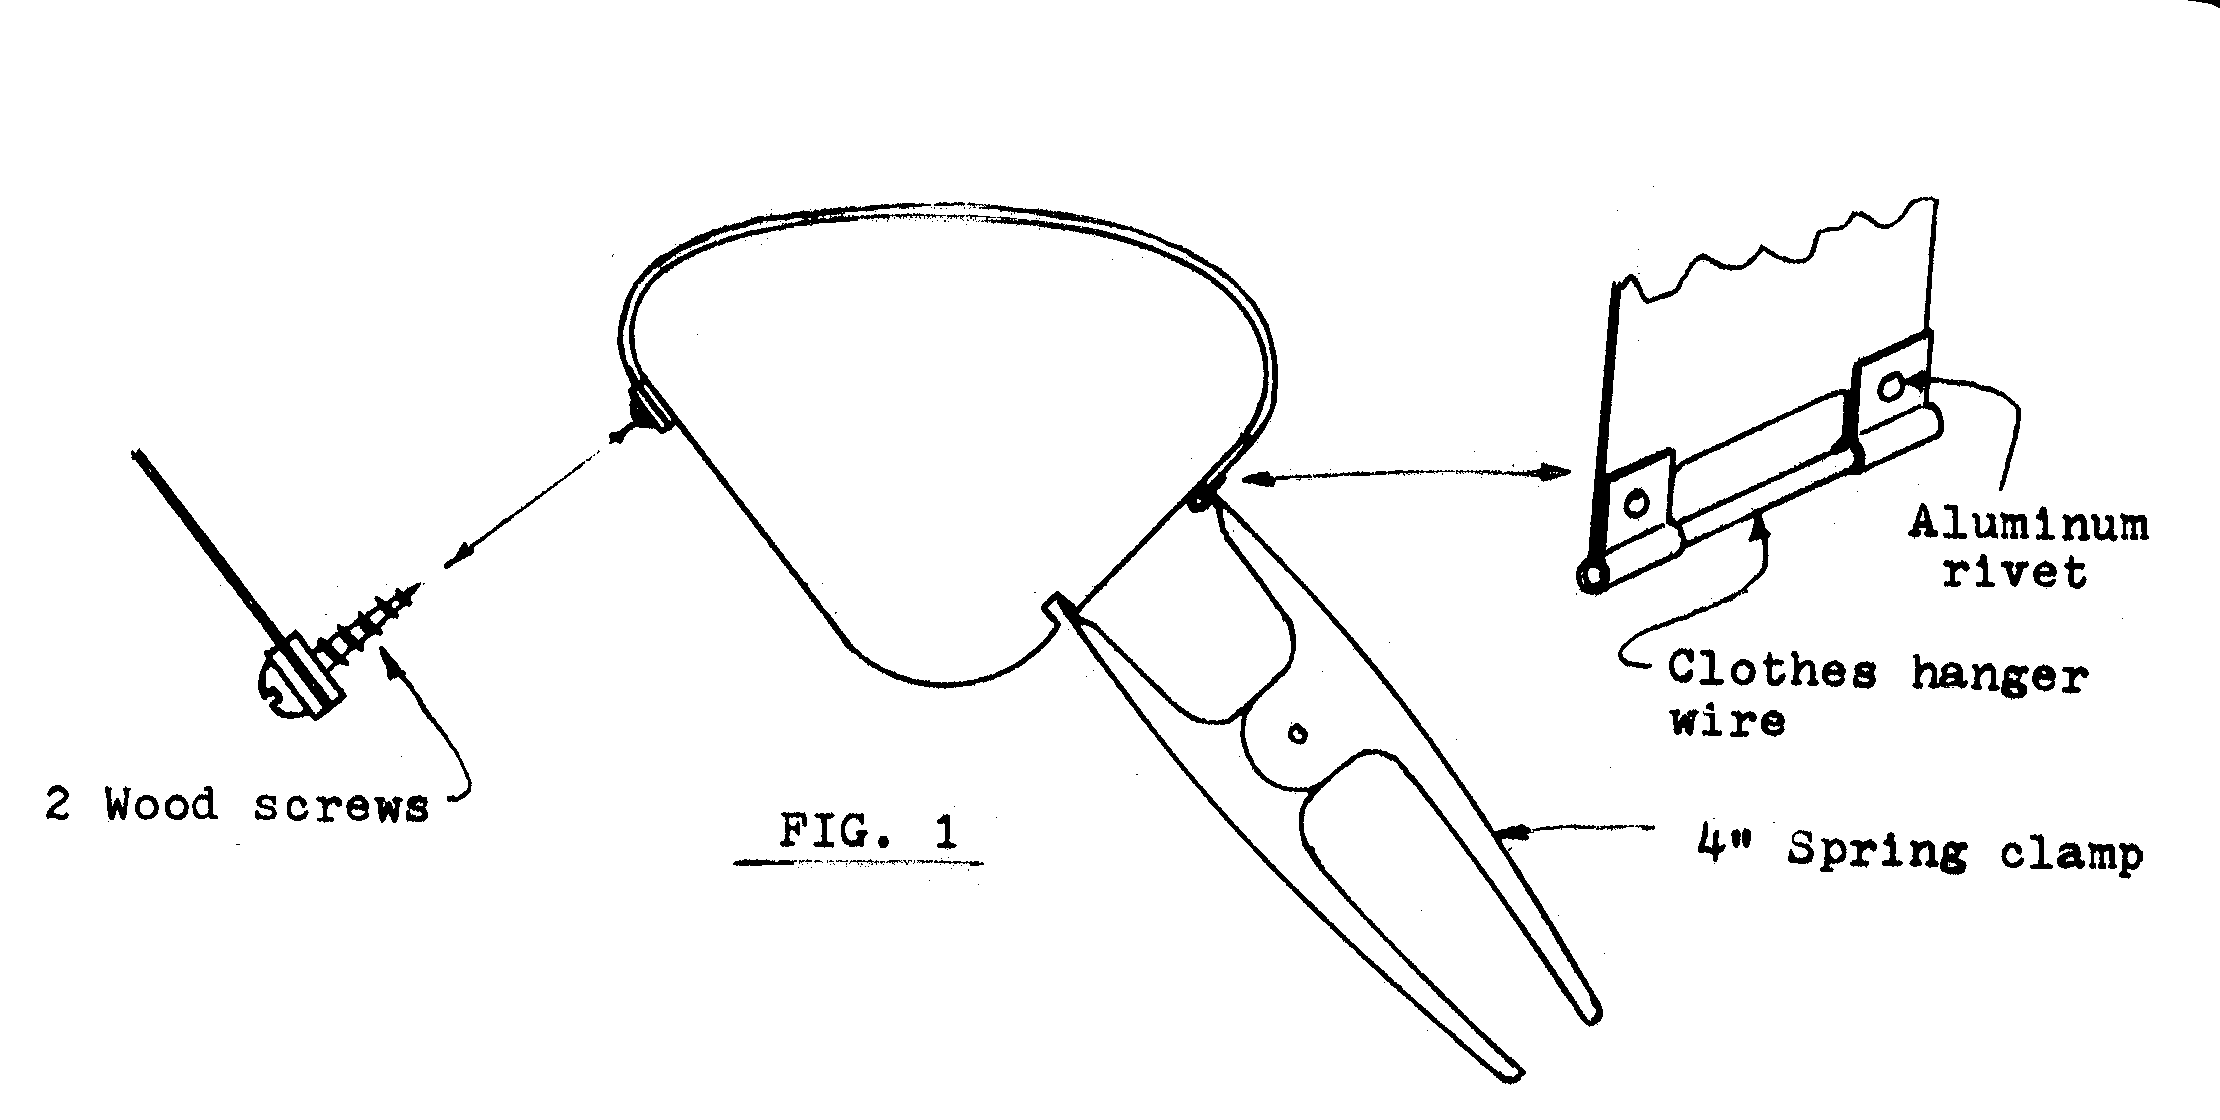
suitable. The metal backup strip is fastened to the wood form
by sandwiching it between two strips of 16 ga. .050 aluminum and
fastening with two wood screws. You may want to vary the .050
thickness to suit the thickness of your rib material. The other
end is held in place with a 4 inch spring clamp. Refer to fig.
1 for details.

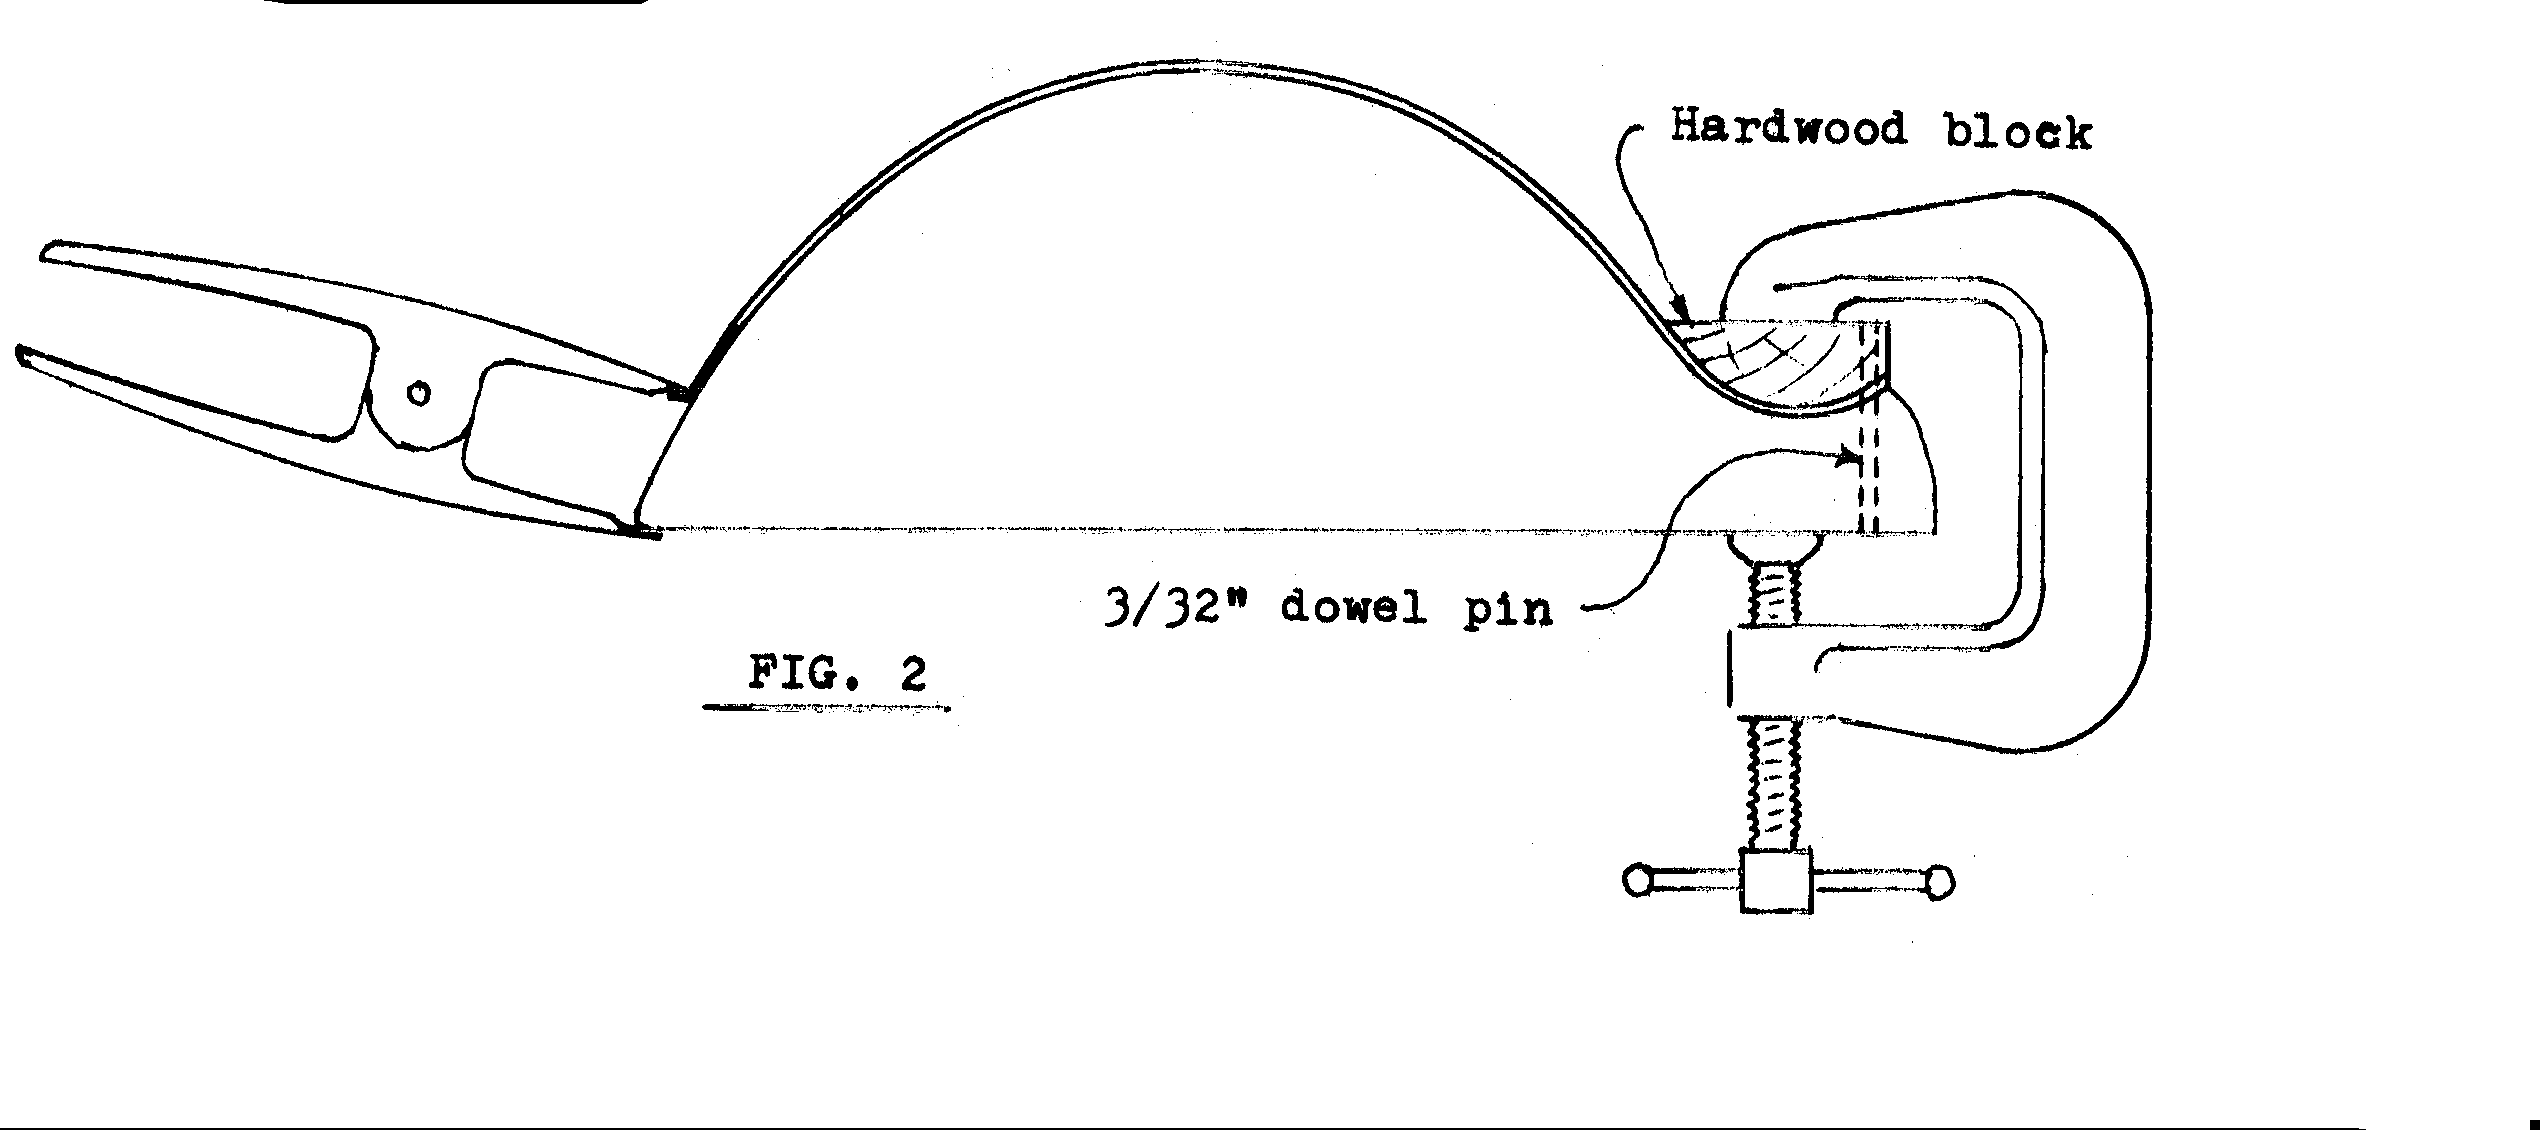
The forms for bending the ribs for the upper and lower bouts are
similar, except for size. Here we can use a heavier material for
the backup strip, and because the local metal surplus dealer had
a quantity of 25 gauge .020" stainless steel on hand I made
use of it. One end was preformed to conform to the sharp radius
of the corner and the other end was bent to provide a ledge for
the spring clamp. On these forms a curved clamping block is used
to clamp the rib material tightly to the form at the sharp reverse
bend. A dowel pin made from a small plated nail is helpful in
keeping the parts properly aligned while being clamped. Refer
to Fig. 2 for details.

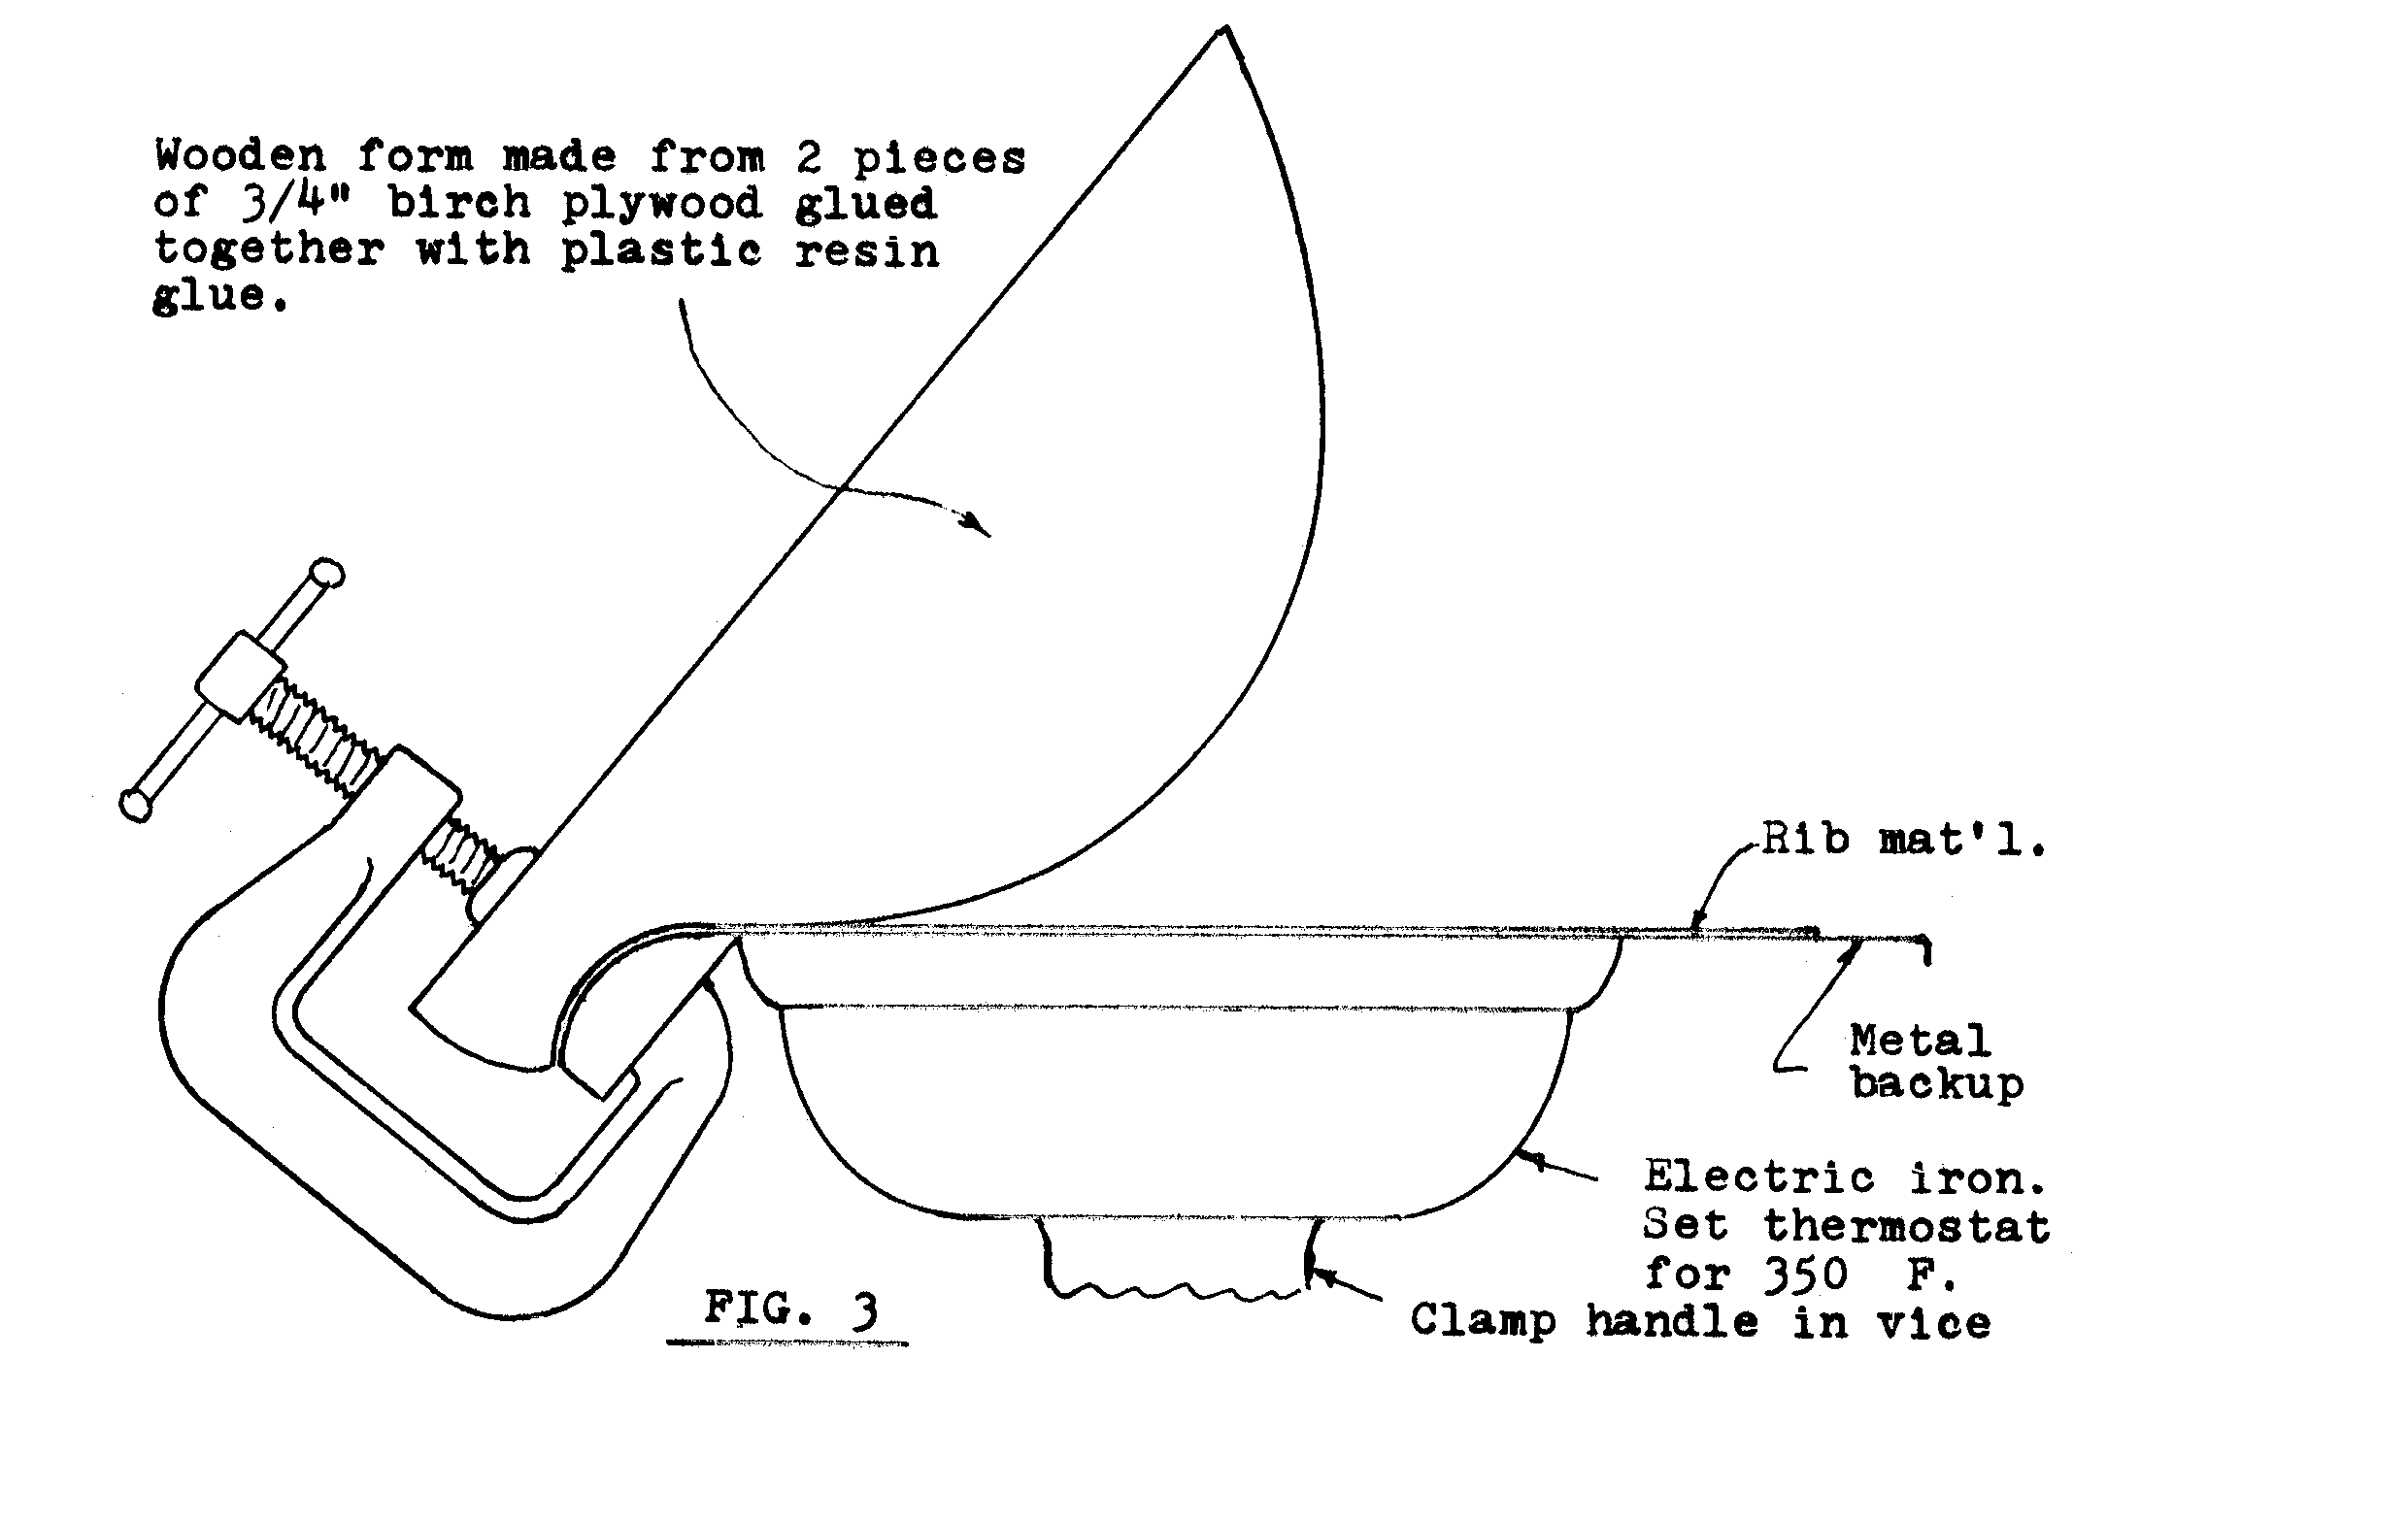
Here the end of the rib material is preformed roughly with the
heat from the iron using the back up metal strip as a form. it
is then assembled with the rib end against the dowel p in and
clamped. The straight rib sticking out from the form is then laid
on the iron as shown in Fig. 3 and the form rolled up as the wood
becomes plastic. A spring clamp holds the backup metal strip tightly
around the form until the rib material is thoroughly dry. It is
a good idea to wear canvas gloves for this operation because the
backup metal becomes fairly hot.

Bending the ribs for the center bout is similar except no preforming
is necessary. One end of the wet rib material is wedged against
the .050 space and then the backup strip is laid flat on the iron
and rolled up as described above. The rolling up can be done quickly
when brought to the correct heat because you are heating a large
area instead of just a narrow section as with a heated bending
iron.
If the spring clamps are released before the rib material is
thoroughly dry, the ribs will tend to straighten, so thorough
drying is essential. This can be accomplished in an hour or so
in the kitchen oven at around 150 degrees F. If you are not in
a hurry, overnight in a warm spot by the furnace or on top of
the water heater should do it. The drying operation shows the
advantage of using spring clamps. If clamped tight at both ends,
the metal backing strip, especially aluminum, expands much more
than the wood form when heated and will bow out away from
the form. This could allow a deformity to develop in the rib curvature.
With the spring clamp the rib is always held tight against the
form.
It is a good idea to seal the wooden form against moisture
or steam from the wet rib material. I used a clear thin epoxy
varnish applied with a small piece of cloth ù allowing
the wood to soak up as much as it could and then wiping the excess
off with a paper towel. This saves cleaning brushes and works
quite well to give a waterproof wear-resistant finish. A coat
of shellac or sealer should seal the wood equally as well.
There will usually be a small amount of springback from the
original curvature of the form, so if you want the ribs to fit
the rib mold exactly, you will want to compensate for this by
exaggerating the curvature of the bending form slightly. Since
it is made of wood it is easy to modify and a little experimenting
will give you perfect fitting ribs every time.
All Bulletin articles are copyrighted ©1997 by the
Southern California Association of Violin Makers. Contact Bulletin
editor John Gilson, at the address given on our home page, for
permission to reproduce Bulletin material.
Return to home page of the Southern California
Association of Violin Makers .


